Sunday, October 23, 2011

Spiced Pumpkin Walnut Bread

Obviously I am on a full fall cooking kick and staring at the pumpkins on my balcony I needed to make something pumpkin-y. I only had regular size loaf pans and they are always just too big for me and my husband to share so it was perfect when we were at a yardsale and I came across these....!


4 half loaf pans!! Perfect size to keep and to give away which is exactly what we did...

This bread really encompasses the taste of fall with pumpkin, delicious spices and walnuts.

Spiced Pumpkin Walnut Bread
Bon Appetit magazine, nov 1995

Makes 2 loves

3 cups sugar
1 cup vegetable oil
3 large eggs
1 16-ounce can solid pack pumpkin
3 cups all purpose flour
1 teaspoon ground cloves
1 teaspoon ground cinnamon
1 teaspoon ground nutmeg
1 teaspoon baking soda
1/2 teaspoon salt
1/2 teaspoon baking powder
1 cup coarsely chopped walnuts

 Preheat oven to 350 degrees. Butter and flour the loaf pans (9x5x3) and set aside. Beat sugar and oil until well combined. Add pumpkin and eggs and mix. Sift flour, cloves, cinnamon, nutmeg, baking soda, salt and baking powder into another large bowl.

**I didn't have ground cloves but its pretty easy to grind your own with a mortar and pestle. I've been doing this a lot lately so I don't have duplicate spices since I rarely use some of them and they lose flavor over time.


Stir flour into pumpkin mixture in 2 batches until just combined. Mix in walnuts.
Divide batter into pans and cook for about 1 hour for larger pans and 50 min for smaller pans or until a knife just comes out clean. Remove from oven and let cook for several minutes. Remove from pans and cool completely.


Bacon Jam Spread

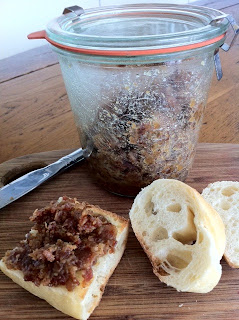
I wanted to try something new for my friends birthday party and since it's Fall I wanted something savory. Bacon is just so damn good...so Bacon Jam must be delicious. I am deeply in love with German schmaltz- a spreadable fat (usually duck or goose sometimes with apples and or onions). It's amazing on good toasted bread.  With the purchase of my new slow cooker, everything just fell into place.

Bacon Jam
adapted from Everyday Food December 2010

2lbs bacon sliced into 1" slices or cook as whole slices and cut later.
2.5 medium onions- diced small
3 large garlic cloves, peeled and smashed
1/2 cup plus 2tbs good cider vinegar
1/2 cup plus 2tbs packed dark brown sugar
1/3 cup pure maple syrup
1 cup fresh brewed coffee

In a large skillet (or two) cook bacon until the fat is rendered and slightly brown (about 15 min). Remove bacon and let drain on paper towels. Pour off all of the fat except about 1Tbs.

Add onions and garlic, cook until translucent (about 5 minutes). Add vinegar, sugar, maple syrup and coffee to the onion mixture. Bring to a boil and cook for about 4 minutes scraping all of the bacon bits off the bottom of the pan. Turn off the heat, add the bacon to the mixture and stir until coated.

Have your slow cooker on a low setting, add bacon mixture and with the lid off- cook for approx 3.5 to 4 hours. If jam is getting too dry early on, add a little water and mix as you go. You want the mixture to be thick and syrupy. Pulse in a food processor until spreadable. Store in jars- will keep up to 4 weeks in refrigerator.

Serve on bread, in a grilled cheese sandwich or with eggs for brunch. Enjoy!

Cinnamon Raisin Bread

I really love Cinnamon Raisin Bread and when I came across a recipe on the Kitchn for a homemade recipe I knew I had to try it right away. It's so delicious, easy to slice and toast and it makes two loves so you can easily freeze one for a later craving. I added a few bonus raisins in the end too...

Cinnamon Raisin Bread
(makes 2 loaves)

from theKitchn.com


1 cup (6 oz) raisins (feel free to add a little more if you love raisins like I do)
1 cup (8 oz) warm water
1 tablespoon active dry yeast
1 cup (8 oz) milk, whole, 2%, or skim
1/4 cup (2 oz) unsalted butter, melted
2 teaspoons salt
5 1/2 - 6 cups (1 lb 11.5 oz - 1 lb 14 oz) all-purpose flour
Filling:
1/2 cup granulated white sugar
1 1/2 tablespoons cinnamon
1 large egg beaten with 2 teaspoons warm water


Put the raisins in a small bowl and cover them with hot water. Have the raisins sit for about 10 minutes to get nice and plump and juicy. Drain.

Pour a cup of water into the bowl of a standing mixer or large mixing bowl (if mixing by hand) and pour the yeast on top of the water. Let sit for a few minutes until dissolved and starting to bubble a bit- then stir in completely.

Add the milk, melted butter and salt to the water/yeast mixture.  Add 5 1/2 cups of the flour and stir to form a sticky dough. Knead in your mixer on low speed with a dough hook or knead by hand for 8-10 minutes to form a smooth, slightly tacky dough. Now, check the dough- if it's super sticky- add a little more flour, a bit at a time. The dough is ready when it forms into a ball and when you poke it, the dimple springs back.
Take your raisins and add a little flour just to coat them lightly- soaking up any extra water. Toss into tough and knead until combined.

If kneading by hand, turn the dough out onto your work surface and pat it into an oval. Sprinkle about half the raisins over the top and fold the dough like a letter. Pat it into an oval again, sprinkle the remaining raisins, and fold it again. Knead the dough by hand for a few minutes to distribute the raisins through the dough.

Return the dough to the bowl and cover. Let the dough rise in a warm place until doubled in bulk, about an hour. Meanwhile, combine the sugar and cinnamon in a small bowl and beat together the egg and water in a second bowl.

Divide the dough into two pieces. Working with one piece at a time, roll the dough out on the counter. It should be slightly less wide than your baking pan and as long as you can make it. The thinner the dough, the more layers of crazy-good cinnamon swirl you'll end up with. If the dough starts to shrink back on you, let it rest for a few minutes and then try again.

Brush the entire surface of the dough with egg wash, leaving about two inches clear at the top. Sprinkle generously with cinnamon and sugar. Starting at the end closest to you, roll up the dough. When you get to the top, pinch the seam closed. Transfer the loaf to your loaf pan seam-side down. Repeat with the other half of the dough.

Let the loaves rise until mounded over the top of the pan and pillowy, 30-40 minutes. Halfway through rising, preheat the oven to 375° F.

Brush the top with some of the remaining egg wash. If desired, sprinkle some of your remaining cinnamon-sugar over the tops of the loaves as well. Bake for 40-45 minutes until golden brown.
Remove the loaves from the pans and allow them to cool completely before slicing. Baked loaves can also be frozen for up to three months.

Slice, toast and top with fresh butter. So good...

Sunday, August 28, 2011

Pictures from Hurricane Irene- Brooklyn, NY

The afternoon before the Hurricane was to directly hit us in Brooklyn, NY we took a little trip around the neighborhood to see what people did to prepare. These were some great images we found in Red Hook, Bklyn.


Luckily the storm passed with not much damage (the good news)- the trains are even going to be back running just in time to go to work on Monday:(
(the bad news)

Homemade Focaccia- Rosemary/Scallion and Red Onion/Green Olive

I'd like to continue with my David Tanis kick please. About 2 weeks ago we had our friends over for dinner and I wanted to try and re-create some local restaurant dishes. The Sicilian Tuna sandwich on Focaccia at Frankies Spuntino is just super tasty and its a favorite of mine and my husbands. I was feeling adventurous not ever making my own Focaccia and its actually a lot easier then I thought.

Having a friend with a strong aversion to rosemary, I did half rosemary/scallion and the other half with sliced red onion and green picholine olives.

Focaccia
adapted from David Tanis (heart of the artichoke and other kitchen journeys 2010)

1 1/2 cups warm water
1 tablespoon yeast
3 cups all purpose flour (plus extra for board)
2 teaspoons fine sea salt
1/2 cup olive oil
1/4 cup scallions- chopped
1/2 tablespoon rosemary- chopped
1/4 cup sliced red onion
1/4 cup chopped olives (green or black will both work great)
 Coarse salt for sprinkling

Put the 1/2 cup of warm water in a bowl, add yeast and 3 tablespoons of the flour and let sit until it starts to bubble (about 5-10 minutes)

Add the remaining 1 cup of water, the rest of the flour, the salt and olive oil. Stir together with a wooden spoon until it just starts to come togehter.- It will be super sticky. Sprinkle the dough with a little more flour and knead in the bowl for a few turns. Then remove from bowl and knead a few times on a floured bowl.

Put dough into a large well oiled bowl and cover with plastic wrap and let sit in the fridge for a few hours if possible (or overnight). Then remove dough and pat it into a very generously oiled baking sheet (the standard 9x13 works fine). Give it a little time to work itself into shape- gently pushing it into the corners.

Now cover the baking sheet with plastic wrap and leave in a warm spot for about an hour.

Preheat oven to 400 degrees. Sprinkle top of dough with Rosemary, Scallions, Onions and Olives or whatever you decide on and drizzle with a little olive oil. Then make little dimples along the top of the dough in an order (about 6-8 dimples across and make little rows over the entire bread with your finger)

Sprinkle with coarse sea salt and bake for about 30 minutes until its lightly browned at the top and the bottom seems like its done.

Delicious.
For the tuna sandwich, slice bread in half, spread mayo on each side, add sliced red onion, arugula, thinly sliced tomato and a good quality tuna in oil ( I use Tonno Genova Solid Light Tuna in Oil) Enjoy!

Slow Cooked Carne Adovada - Pulled Pork

So I am officially obsessed with David Tanis. His cookbooks, A Platter of Figs and Heart of the Artichoke offer so many amazing recipes I feel that I need to make them all. They are separated into seasonal menus which makes it really easy to find the necessary ingredients depending on the weather.

The one recipe I can't escape from- especially when Hurricane Irene is about to bang on my door, is his just truly delicious Carne Adovada. I serve mine either in tacos with guacamole, pickled red onions, grilled pineapple and cojita cheese or just on a fresh sesame roll. Either way you are going to want to make this again and again.

Each time I make it I tweek a few things, I try out new Mexican Dried Chilis, use a whole bone in shoulder rather then boneless and add a few extra seasonings. This way seems to work the best for me...


Carne Adovada
slightly adapted from David Tanis (heart of the artichoke and other journeys 2010)


6 ounces dried New Mexico red chilis ( I mix 3 oz New Mexico red chilis, 2 oz Chile Guajillo and 1oz Chile Arbol but it just depends what you can find in your store)
2 Tablespoons vegetable oil
1 large onion, finely diced
Salt and Pepper
6 garlic cloves, roughly chopped

1 teaspoon coriander seeds, toasted and ground (see below for tips)
1 teaspoon cumin seeds, toasted and ground (see below for tips)
1 bay leaf
6 pounds bone in pork shoulder (about a small whole pork shoulder with skin on about 1/3) You can also use 3 pounds boneless pork shoulder


For toasting and grinding the seeds, it really makes all the difference. I never use to do it and I really had no idea what all of those seasonings tasted like. Once you start toasting them you can totally smell how lemony coriander is! Just add the seasonings to a heated cast iron pan or skillet over medium heat and toast until fragrant (about 3-4 minutes) Then grind in a mortar.


To start on the chili's, you need to toast them in a cast iron pan over medium heat- about 1-2 min on each side until they just start to become fragrant and slightly char. Do this in shifts- it makes it a lot easier. Then put to the side and work on the next batch. Once all the chili's are toasted, cut them in half and remove all stems and seeds.


NOTE! I make myself some makeshift gloves because these are some serious chilis. Put some ziplock bags over your hands while cutting the chilis and removing the seeds. This helps to keep the oils off your skin and you wont have to soak your hands in milk later on:)


Once all seeded, put the chilis into a pot with water and bring to a boil. Simmer for about 5 minutes and let the chilis cool in the liquid. Then puree the chilis with a cup of the cooking liquid until nice and smooth. (If using a blender, you can fill blender and cool in refrigerator completely before blending- avoiding the heat blowout of peppers all over your walls)


Heat the vegetable oil in a large skillet over medium heat. Add the onion and season with salt and pepper. Cook for about 5 min and be watchful not to brown the onions so keep stirring them around. Then add the garlic, ground cumin, coriander and bay leaf. You can add a little more salt and simmer for another 5 min. (You can do this ahead of time and just refrigerate the sauce until ready)


Preheat the oven to 350 degrees. Put the pork in a cast iron heavy ovenproof pot with a lid and season with salt and pepper. Then top with the chili sauce. Bake for about 3 hours or until meat is falling off the bone. Usually after an hour or so I'll flip the meat over and baste it, again at hour two and hour two and a half just to keep testing it for done-ness.


When falling off the bone- remove the pork from the pot and place it on a cutting board. At this point I will peel off the fatty skin and discard. Then gently shred the meat with two forks and discard any bones, extra fat, etc. Add into a new pot with some of the sauce (start with a cup or so and mix, then add more to taste) You probably wont need all of the sauce.


This is good for about 4 days so just keep reheating it on the stove and enjoy!

Saturday, August 27, 2011

Grilled Flounder in Corn Husks with Charred Corn Salsa and Oven Roasted Potato Wedges

I made this a few weeks ago when the weather was perfect and we wanted a light summer dinner. The delicious combination of fresh farmstand corn and local fish made this better then expected.

You can use Halibut, Flounder or any other type of meaty white fish.

Grilled Fish in Corn Husks with Charred Corn Salsa
adapted from: Chow Grilling Recipes Aug 12th 2011
 
1/2 medium red onion, small dice (about 1 cup) 
2 tablespoons plus 4 teaspoons freshly squeezed lime juice (from about 2 medium limes) 
1/4 teaspoon kosher salt, plus more as needed 
Freshly ground black pepper 
3 jalapeños 
4 ears corn, husks on 
1 (1-pound) center-cut flounder piece, skinned
1 tablespoon olive oil 
2/3 cup coarsely chopped fresh cilantro (about 1 bunch) 
1 medium lime, cut into wedges

Baked Potato Wedges
-Several Small Red and White Potatoes- (approx 2lbs)
-Olive Oil
-Kosher Salt and Fresh Ground Pepper
 
Potatoes:

Preheat Oven to 425. Slice Potatoes into wedges, mix with Olive oil and Salt and Pepper to taste in a large bowl. Lay out on baking sheet, add more salt and pepper and bake for about 35-45 min flipping wedges halfway through to brown evenly.


Fish/Salsa:
  1. Place the onion, 2 tablespoons of the lime juice, the measured salt, and pepper to taste in a large bowl. Stir to combine; set aside.
  2. Stem and finely chop 1 of the jalapeños; set aside.
  3. Trim off the silk and cut off the ends of the husks that are likely to burn. Slice off the stem ends of the corn so that the husks easily come away from the ears without tearing. Set aside 16 wide, untorn husks (at least 3 1/2 inches long). Rinse the husks in cold water and shake off the excess. Try and find husks that are similar is size but you can work with this in a bit...
  4. Cut fish into even pieces (approx 8, can make into chunks if easier)
  5. Place 8 of the corn husks on a work surface. (so to make 4 fish packets, just double layer 2 husks per packet for the bottom layer.  Place a piece of fish lengthwise along the center of each husk, making sure the husk is curling around the fish.
  6. Evenly divide all of the finely chopped jalapeño and half of the cilantro over the tops of the fish pieces.
  7. Sprinkle each piece of fish with 1/2 teaspoon of the remaining 4 teaspoons lime juice.
  8. Cover each piece of fish with a second double layered husk curling over and around the first husk, making sure the wide end of the top husk is covering the narrow end of the bottom husk and the fish is completely encased. (The parcels will not be tightly closed.)
  9. Place the fish parcels cilantro-jalapeño-side up on a baking sheet or large plate and refrigerate.
  10. Heat a grill pan or outdoor grill to medium high (about 375°F to 425°F). Place the ears of corn on the grill, cover the grill, and cook, rotating the corn a quarter turn every 2 1/2 minutes, until the outside is evenly charred and the corn is tender, about 10 minutes total. (I cheated a bit and ended up using a blow torch I got at a yardsale ha)  Meanwhile, place the remaining 2 jalapeños on the grill and cook, turning occasionally, until blistered and charred in spots, about 5 to 7 minutes total.
  11. When the corn and jalapeños are ready, transfer both to a cutting board. When cool enough to handle, cut the corn kernels off the cobs and add the kernels to the reserved onion–lime juice mixture. Stem the jalapeños, finely chop, and add to the onion–lime juice mixture. Add the remaining half of the cilantro and stir to combine. Taste and season with salt and pepper as needed; set aside.
  12. Place the corn-husk-wrapped fish on the grill cilantro-jalapeño-side down. Cover the grill and cook for 2 minutes. Using tongs, flip the parcels, cover the grill, and cook until the fish is just opaque, about 2 minutes more. Remove to a serving platter. (You can check on the fish to see if it flakes when using a fork). I had to grill an extra 2 min or so but it will depend on the thickness of your fish)
  13. To serve, carefully remove the top corn husks from the fish. Top with the corn salsa and serve with lime wedges.